UMBC, room ECS 023, 2-25-99
Notes by David Joyner. (No claim to completeness.)
Theme: Coordinating squares, static case. The principle of two weaknesses (revisited).
We shall study in this lesson a new method for solving king and pawn endgame problems where the pawn structure is static (fixed). The method of coordinating squares, touched upon in lesson 2, uses three steps for solving such problems:
- determine the critical positions where (possibly mutual) zuszwang occurs,
- use these critical positions to define the initial coordinating squares,
- use the rule of 3 adjacent squares to determine (“map out”) the other coordinating
squares on the board.
Detailed examples will be given below.
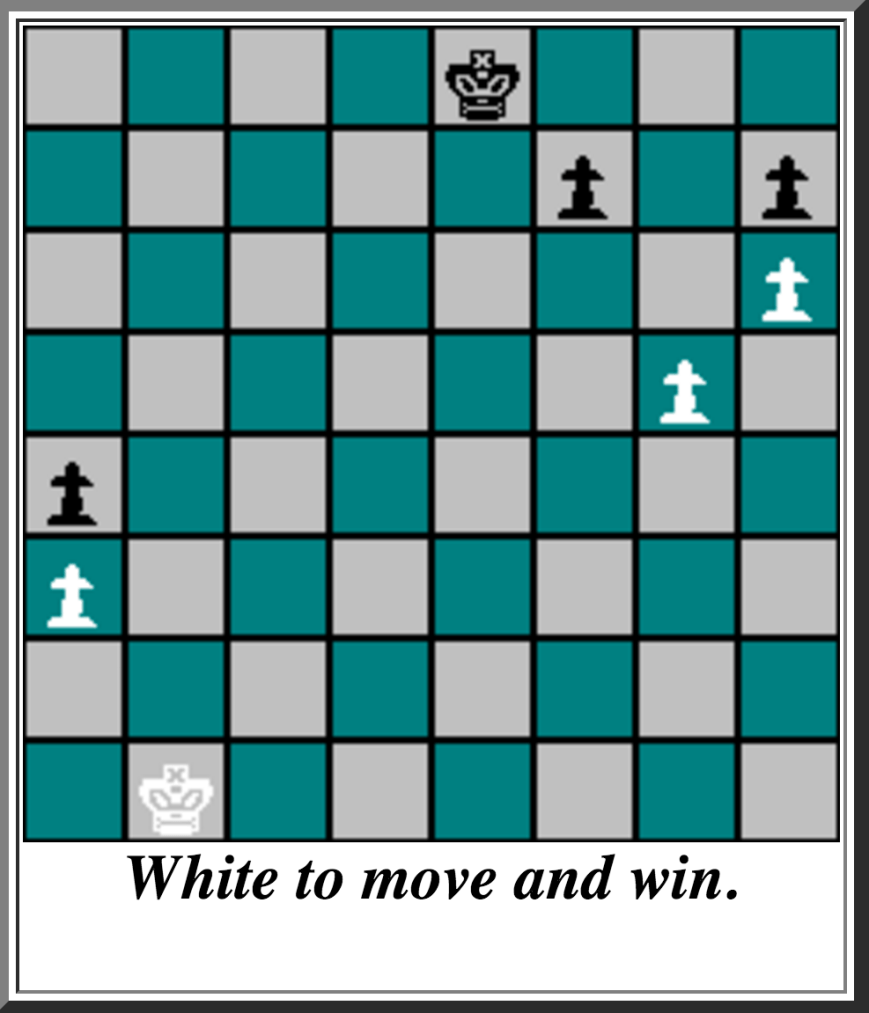
Position 3.1: Study by the Hungarian problem composer Ebers (Maguar Sakkvilag, 1930).
In Forsyth notation:
8/1p5k/1P1p4/3p4/3Pp2p/2K1P2p/7P/8

White to play and draw.
First, we give a solution.
1. Kb2 Kg8 2. Ka1 Kf8 3. Ka2 Ke7 4. Kb3 Kd7 5. Kb4 Kc6 6. Ka5! (this will turn out to define a “critical position”) Kd7 7. Kb4 Ke6 8. Kc3 Kf5 9. d2 g4 10. e2 Kf5 draw. Note that the position after 6. Ka5! is lost for white if it were white to move. (Since it is impossible for white to penetrate blacks position, it is practically impossible for black to lose, so by definition it is not a mutual zuzswang.) If white tried to blockade the black king from the c6 square by playing Kb5 at some point he would lose! (With the white king on b5, the black king on d7, the pawns as above, and with black to move, the white king cannot get back to block the black king from f3 fast enough.) This is a critical position and defines a5-c6 as coordinating squares. Going back one move, we see that b4-d7 are also coordinating squares. (Actually, it is a priori possible that a4-d7 are coordinating squares but with the white king on b4, the black king on d7, the pawns as above, and with black to move, the white king cannot get back to block the black king from f3 fast enough, so white loses. Thus a4-d7 can be ruled out.)
Another solution: 1. Kb2 Kh6 2. Kc2 Kh5 3. Kd2 Kg6 4. Kc1 Kf6 5. Kc2 Kf7 6. Kb2 Ke6 7. Kc3 Kd7 8. Kb4 Kc6 9. Ka5! Kd7 10. Kb4 draw.
This study was mysterious and stunning to me when I first saw it. It is a very complex study to analyze. This study can be solved easily once you know my method of coordinating squares. The key idea is that black must try to exploit the two white weaknesses: the hole at f3 and the hole at c6.
Rule of 3 Adjacent Squares: The knowledge of the coordinating squares of any three adjacent squares (at most one of which is allowed to be a square of exception) neighboring a given square determines the coordinating square of that square.
Summarizing what we know so far,
a5-c6,b4-d7
are coordinating squares. The above Rule of 3 Adjacent Squares gives us the following coordinating squares:
a5-c8, a4-d8 , c3-e6, b3-e7, a3-e8, c2-f6, b2-f7, a2-f8,
d2-f5, e2-g4.
For example, the fact that a4-d8 is also a coordinating square can be visualized by the following picture:
                    a5 <-----> c6
                  /               \
               a4 - b4 <-----> d7 - d8
                  \               /
                    b5 <-----> c7 (exceptional)
In addition, a2-h8, b2-h7, c2-h6, d2-h5 are coordinating squares. This data gives rise the the solutions given above.
Position 3.1a: Study by Ebers (Maguar Sakkvilag, 1935).
In Forsyth notation:
4k3/5p1p/7P/6P1/p7/P7/8/1K6
Homework
Solve the following problems.
4k3/8/8/1p5p/1P5P/8/3K4/8

White to play and win.
solution below
In Forsyth notation:
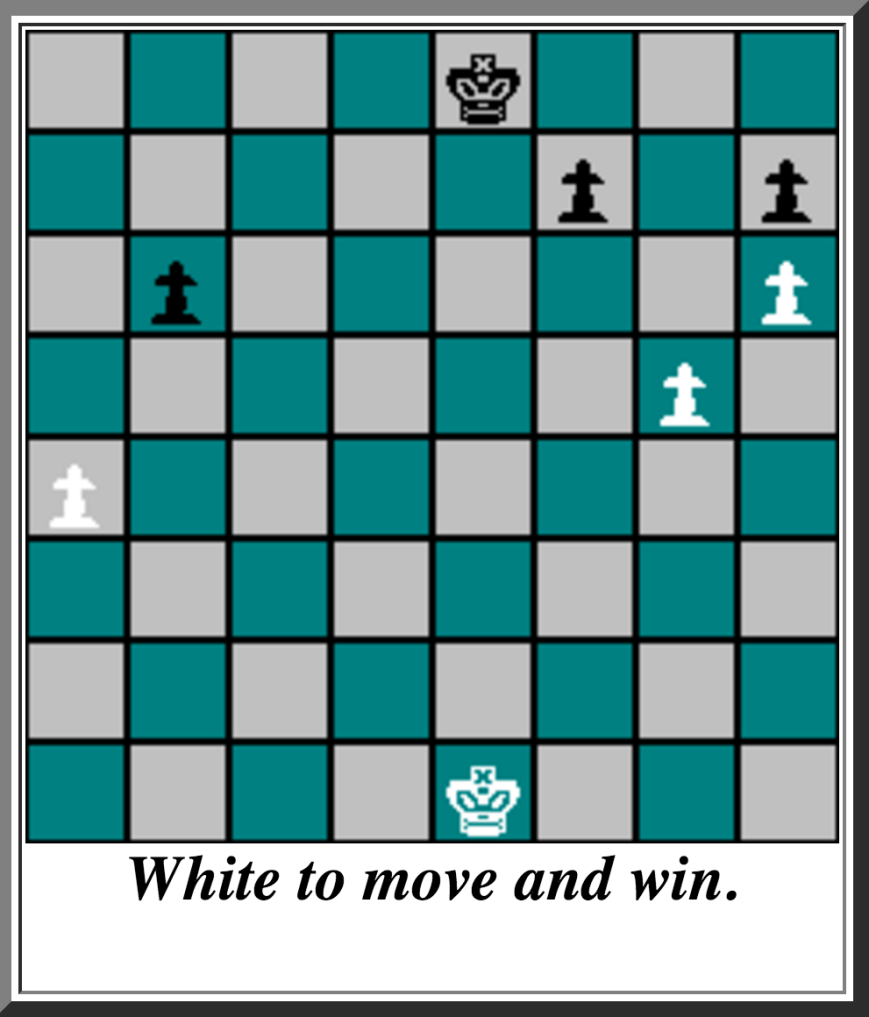
8/5k2/2p5/1pPp4/p2P2p1/P2P2P1/P5K1/8
White to play and win
solution below
In Forsyth notation:
4k3/5p1p/1p5P/6P1/P7/8/8/4K3
White to move and win.
Homework solutions:
- white king on d4, black king on d6,
- white king on e4, black king on e6,
- white king on f4, black king on f6.
These lead to the coordinating squares
d4-d6,e4-e6,f4-f6.
The rule of 3 adjacent squares implies that we have the coordinating squares
d3-d7,e3-e7,f3-f7, d2-d8,e2-e8,f2-f8 .
Now we can determine the following solution:
1. Ke2! Kf8 2. Kd3 Ke7 3. Ke3 Kd7 4. Kf4 Ke6
5. Ke4 Kf6 6. Kf4 (not 6. Kd5 Kf5 7. Kc5 Kg4 and
the race to promote the pawns is a draw) Ke6
7. Kg5 and white wins.
- The most easily determined “critical positions” are (with black to move and pawns as in the diagrammed position):
- white king on a5, black king on c7,
- white king on b4, black king on d7.
We claim: white king on c3, black king on e6, is a critical position. The only other possibility if the white king was on c3, would be if the black king on e7 was a draw for black (with black to move).
Proof: 1. … Kd7 2. Kc2! Ke6 3. Kd2 Kf6 4. Kc3 intending
Kb4, Ka5 wins.We claim: white king on d2, black king on f5, is a critical position. The only other possibility if the white king was on d2, would be if the black king on f6 was a draw for black (with black to move).
Proof: 1. … Ke6 2. Kc2! Kd7 (2 … Ke7 3 Kc3 would
transpose into the losing line above)
3. Kc3. Now if 3 … Kd8 or 3 … Kc7 or 3 … Kc8 then 4. Kd2 and 5. Ke3 wins. If 3 … Ke6,-7,-8 then 4. Kb4 and 5. Ka5 wins.Therefore we have the following coordinating squares
a5-c7,b4-d7,c3-e6,d2-f5.
We could go on but this is all that is needed to solve the study.Solution: 1. Kf2. Now either 1. … Kf6 or 1. … Ke6 is forced. If 1 … Kf6 then 2. Ke2 Ke6 3. Kd2 Kd7 (3 … Kf6 4. Kc3 wins the race to a6) 4. Ke3 wins the race to f4. If 1 … Ke6 then 2. Ke2 Kf6 3. Kd2 and white wins as above. For example, 1. Kf2 Ke6 2 Ke2 Kf6 3 Kd2 Ke6 4 Kc2 Kd7 3 Kc3 Kc7 4 Kd2 Kd7 5 Ke3 Ke6 6 Kf4 and white wins.
- First, the solution (given in class; R. Fine’s Basic Chess Endings was referenced): 1 Kd2 (1 Ke2 Kd7 draws while 1 Kf2? loses!) Kd8 2 Ke2 Ke8 3 Kf3 Ke7 4 Ke3 Ke8 5 Kd4 Kd8 6 Ke4 Kd7 7 Kd5 Ke7 8 Kc6 and white wins.
The most easily determined “critical positions” are (with black to move and pawns as in
the diagrammed position):
- white king on f6, black king on f8,
- white king on e5, black king on e7,
- white king on d5, black king on d7.
(It is easy to see that in any of these positions, black must give way to the white king’s path to either the king-side pawns or the b6 pawn and will then create a passed pawn which will promote first.) The rule of 3 adjacent squares implies that we have the additional coordinating squares
f5-e8,e4-d8,f4-d7,d4-e8,c4-e7,e3-e7,d3-d7,c3-d8,e2-d8,d2-e8.
This gives the solution above. It also gives another solution: 1. Kd2 Kd8 2 Kd3 Ke7 3 Kc4 Kd7 4 Kd5, reaching the third critical position listed above, hence a win for white.
